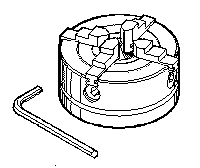

Because of the varied uses of the 4-Jaw Chuck it would be impossible to write a comprehensive set of safety rules to cover every specific use, other than simply suggesting the use of liberal amounts of "Common Sense". If you're not sure of your set-up, it probably isn't good enough. Get a machinist with more experience to advise on a safe set-up. Be sure to remove the chuck key before turning the spindle on. Work Safely!
The screws that move the jaws are 20 threads per inch (T.P.I.). A complete revolution is .050". If you keep this number in mind when indicating a part in, it can speed up the process.
First, use the lines machined on the face of the chuck to roughly align the part concentric with the chuck. With an indicator, read the run-out. Move the jaw closest to the high or low point 30% of the total indicator reading in the proper direction.
NOTE: We recommend the 30% figure because the high point of a part will very seldom line up with a jaw. Moving a jaw too much can cause "chasing your tail", or simply moving the high point around the chuck.
EXAMPLE
The indicator shows a .030" run-out. 30% of .030" is approximately .010". If one revolution of the jaw feed screw is .050", then a little less than a 1/4 turn will be .010". Back the jaw out this amount and tighten the opposite jaw. Do NOT tighten the jaws beyond "snug" until the part is running within .005" T.I.R. (Total Indicated Reading). Repeat this process until the part runs within your specifications. Once the part is running withing .002" T.I.R. it can usually be "brought in" by a final tightening of the jaws. It should also be noted that the chuck jaws are ground with a slight angle to allow the jaws to apply equal pressure to the tip and base when properly tightened. This angle amounts to less than .001" on the jaw surface.
When reversing jaws, be sure not to force a jaw onto the guide rails with the screw. "Wiggle" the jaw as the screw is advanced until the jaw moves in unison with the screw without binding.
If an off balance part has to be run, be sure to turn the motor on at a low RPM setting and bring the speed up slowly; never go past the point that the machine starts to vibrate.
Should the chuck jaws ever become worn or damaged, we recommend you return your chuck to the factory where we will replace the jaws and assure that the chuck is adjusted within tollerances. If the chuck body is damaged, replacement of the entire chuck is usually more economical than attempting to repair the body. If you wish to attempt the replacement of a jaw or jaws yourself, measure the width of the jaw you're replacing carefully with a micrometer, and give us the dimension so we can assure a perfect replacement.
Joe Martin, President and Owner
SHERLINE Products
|
NO. REQ. |
PART NO. |
DESCRIPTION |
|
1 |
1144 |
Set of 4 Chuck Jaws* |
|
1 |
1146 |
4-Jaw Chuck Screw* |
* Both P/N 1030 and P/N 1044 chucks use same size jaws and screw.
Lathes can now be purchased packaged with chucks and other preselected groups of accessories. See the page on PACKAGE DEALS. Save time and money by buying a package.
RETURN TO CHUCKS OPENING PAGE
VIEW 3-JAW SELF-CENTERING CHUCKS
VIEW 4-JAW SELF-CENTERING CHUCKS
RETURN TO ACCESSORIES MASTER LIST
Shop for Sherline LATHES
Shop for Sherline MILLING MACHINES
RETURN TO My Home Page
| Home
Page | Frequently
Asked Questions | Testimonials
| Lathes
|
| Mills
| Accessories
|
Tool
Prices | Accessory
Prices |