Back to my Clock, Watch and Lathe Courses
*NOTE: These instructions also apply in general to the Model 5650/5660 upgrade from standard Sherline mill to 8-direction, the Model 3580/3585 multi-direction vertical milling column and the Model 5680/5685 upgrade from standard vertical milling column to multi-direction vertical milling column. The drawings and exploded view shown here cover the general aspects of assembling and aligning a multi-direction mill. Specific instructions and appropriate exploded views are included with the related columns or upgrades when they are purchased.
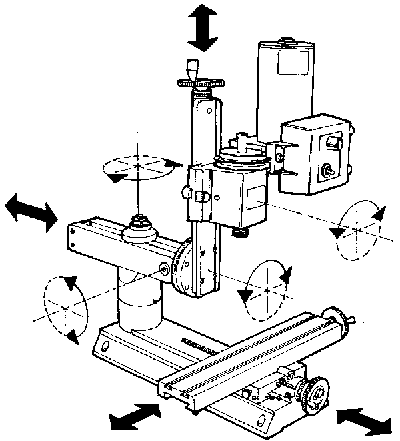
The design of the 8-direction mill allows you to do everything that could be done with previous models of the Sherline mill plus much more. Now angled holes can be drilled or milling operations can be completed from almost any angle on parts mounted square to the table. The increased swing and movement of the column allows larger surfaces to be machined, eliminating the need for the horizontal milling conversion.

FIGURE 1-The axes of movement of a Sherline 8-direction mill.
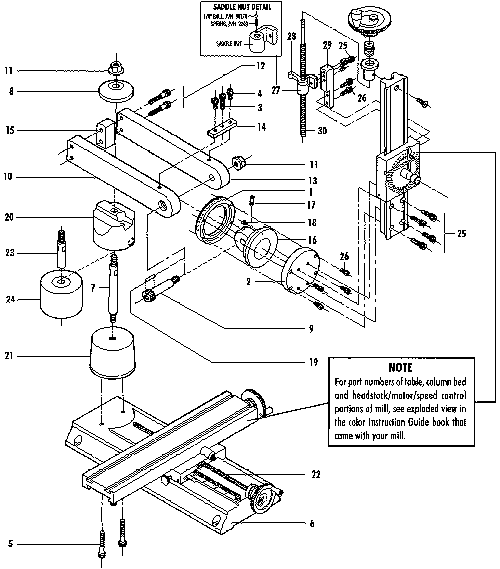
The major components of your new 8-direction mill are preassembled at the factory and are then packaged for efficient shipping. After unpacking your shipping box, you will then assemble the major components to ready your mill for operation. The mill XY base must be removed from the piece of plywood that locates it during shipment. To make any adjustments to the handwheels, backlash, gibs and so on, see the instruction manual that is included with the mill. Instructions are also found there for assembly of the headstock/motor/speed control unit. To assemble the multi-direction column, make reference to the exploded view provided on the last page of these instructions and complete the steps that follow:
1. Attach the round column base (P/N 5666) to the mill base with the two 1/4-20 x 1-1/2" socket head cap screws provided.
2. Screw the arm hold-down bolt (P/N 5613) into the top of the round column base and tighten with an adjustable wrench. Two flat indentations are provided for the wrench to grip.
3. Slip the round column top (P/N 5655) over the pin and rotate it until the flat sides are parallel to the mill base with the engraved indicator line on the same side as the X-axis handwheel.
4. Using an 11/16" or 17mm* wrench, loosen the flange nut holding the bed and swing arm together. Rotate the bed away from the swing arm until they are at approximately a 90° angle to each other. Retighten the flange nut firmly to hold the column in this position. Discard the protective spacer that was installed between the bed and arm during shipping.
*NOTE: A 17mm wrench usually works on an 11/16" hex nut but is a close fit. If your 17mm wrench is too tight and you don't have any inch tools you will have to use an adjustable wrench.
5. Set the swing arm over the column and align it approximately square with the mill base and in about the center of its travel. Make sure the swing arm registers on the flats of the column top and is properly seated. While still holding the swing arm unit in place, set the hold-down washer (P/N 5620) over the end of the bolt. Put a flange nut on the end of the bolt and tighten it against the hold-down washer firmly to lock the swing arm in place.
6. Place the column adjustment block (P/N 5635) on top of the swing arm and attach it with two 10-32 x 5/8" socket head cap screws at both ends. Adjust the 1" long center bolt so that it is just touching the flat in the bottom of the relieved section in the top of the pivot knuckle when the column is in the 90° position.
NOTE: If you remove the column adjustment block to accommodate a backward tilt movement of the column, make sure you replace it when returning the column to an upright position. It not only serves as a reference point when returning the column to the 90° position, it also keeps it from accidentally swinging down and damaging the table if the flange nut is loosened.
7. Slip the alignment key* into its keyway in the mill saddle. Place the headstock/motor/speed control unit over the pin on the mill saddle and over the alignment key. Tighten the set screw in the side of the headstock to hold the entire unit in place. Recheck to be sure you have tightened the flange nut on the shouldered bolt pivot pin securely so that all the weight of the column is not resting on the column adjustment block bolt.
*NOTE: The alignment key is precision ground and will only fit into the keyway with the ground edges toward the sides.
The mill is now ready to be positioned for use if you will be doing angled operations or ready to be squared up if you will be milling square parts. The following instructions will explain the steps used to "indicate in" the head of the mill so it will be square to the table.
The mating surfaces of the arm, the column and the column cap are to be kept free from lubrication. Tightening the column bolt causes friction between these surfaces to resist movement of the arm during the forces and vibration of machining. If these smooth surfaces are lubricated, the arm or the column could move during machining even if the bolt is securely tightened. Clean these surfaces periodically with mild detergent or bathroom spray cleaner to keep a good "bite" between surfaces. The same goes for the surfaces between the "knuckle" and the ends of the swing arm. These surfaces are smooth enough that adjustment is easily accomplished with the nut loosened even without lubrication. They should be free of dirt and chips, but please resist your natural inclination to lubricate them, as they do their intended job better when dry.
Lubrication of the moving components such as dovetails, handwheels and leadscrews is discussed in the appropriate portion of the setup instructions or the instruction manual that comes with your machine.
Having so many adjustable components offers you many more possibilities, but it also brings with it additional challenges. You must make sure each of the adjustments is securely tightened before beginning your cut. Large clamping surfaces are provided which offer plenty of frictional area, so it is not necessary to overtighten the locking nuts and screws. Also, as you adjust your machine closer to the extremes of its movement, it is suggested that you take lighter cuts to reduce the possibility of flexing or vibration. Let common sense and experience be your guide here.
Obviously, the additional movements provided by an 8-direction mill column also mean more will be involved in returning the spindle to a square position in relation to the table. This is the same procedure that must be used on full sized machines that offer similar movements. Being able to square up a mill is one of the skills that must be developed by any machinist. Using the laser engraved markings and the adjustment block provided with your Sherline mill will allow you to bring it back to a location very close to square. From there you will use dial indicators to "indicate in" the head the final few thousandths of an inch. The first few times you do it will probably take some time. The more often you do it, the faster it will go. Remember that alignment for small parts is less critical than if your cut will be traversing a longer distance. How accurately you must indicate in the head will be dictated by the parts you will be making.
NOTE: Before installing the adjustment block squaring fixture onto the swing arm, make sure there are no chips or debris in the pocket of the arm mount or on the end of the adjustment screw.
As with all adjustments on any machine, overtightening can distort components or ruin the built-in accuracy of your machine. This is particularly true on smaller machines where the power of the operator is much greater in relation to the size of the components than it is on larger machines. It is possible to deform the T-slot, which results in a worktable that isn't flat. I believe that the people who damage Sherline T-slots are the same people who break the T-slots on expensive hardened and ground tools. You have to develop a "touch" so this doesn't happen. It is very difficult to correctly square work up with the machine if the table is damaged and the work is "rocking".
MACHINING TIP: Use of a tooling plate (P/N 3560) is an inexpensive way to protect the surface of your mill table while providing a flat, versatile clamping surface.
Squaring up a multi-direction mill can be a chore if you want "perfection". It is best to determine how accurate the setup must be before you start. The larger a close tolerance part is the better the setup required. An error of .001" (.025mm) per inch (25.4mm) would be a very small error on a part .4" (10mm) long. However, a part that is 5" long would have an error of .005". The type of machining that is going to be performed also has a bearing on the quality of the setup. As an example, a drilled hole doesn't usually require the quality of setup that would be used for a bored hole, (assuming the hole is being bored for accuracy rather than for lack of a drill of the proper size). The amount of work that will be done with the setup should be considered too. If your setup is just to do one particular job you only have to set it up close enough to do that job. If the setup will accommodate future operations as well, it should be adjusted to the tolerances of the most critical job. For example, squaring up a mill and vise to work on a number of precise parts is worth more of your attention than setting up to drill one clearance hole in a non-critical part.
Before starting you should realize that these mills are relatively inexpensive machine tools. They have accurately milled slides but the surfaces are not ground. To increase the accuracy of a Sherline tool only a percentage point would dramatically increase the price. We try to give a customer what we consider "the most bang for the buck".
If you are a novice to machining, you probably believe a machine should be designed so that a couple of pins could be dropped into holes, squaring up the machine and eliminating this whole process. After all, that is the way they do it with woodworking machinery. The truth is the tolerances that work well for wood cutting tools simply aren't accurate enough for most metalworking tools. You just can't hold the tolerances required with "pins". When they fit tight enough to lock the head square to the table you can't remove them to do work that isn't square. They become more of a problem than the problem they were installed to eliminate. For example, an alignment or assembly error of .010" in a wooden kitchen table will never be noticed. Usually the floor it sits on is not even flat. It would be a waste of time and effort to make it more accurate than it has to be. On the other hand, a cylinder that has been bored out of square with the crankshaft in an automobile engine could wear the entire engine at an alarming rate. The piston goes up and down a million times in a normal day's use. The additional cost in fuel and shortened life demands accuracy. The Model 2000 Sherline mill allows you to provide this accuracy by making the adjustments required to suit a particular job.
The first place to start is to get the column approximately square with the table using the pointers and laser engraved scales on the machine. The first time you set it up you will have to use a machinist's square on the side-to-side column rotary adjustment as the pointer will not have been "zeroed in" yet. None of these adjustments must be extremely precise at this point because a finger type dial indicator will be used to make the final adjustments later. Remove the headstock/motor/speed control unit from the saddle. Place a machinist's square on the table and line up the front of the saddle to get the column approximately square front to back. Then line up on the right side of the saddle to get the column approximately square side to side. Reinstall the headstock assembly.
(See Figure 2.) To check the built-in error of the machine use a dial indicator mounted in the spindle. Move the table under spindle with the Y-axis handwheel and note the error. This error will usually be around .001" to .002" (.05mm) in 3" (76mm). (Remember the components are not precision ground, they are precision milled.) When squaring the head this error should be accounted for. Remember you are squaring the head and spindle to base of the machine where the saddle travels, not the surface of the table itself. The head doesn't have to be square for this operation as long as you don't rotate the spindle since you are only checking for square in one direction.
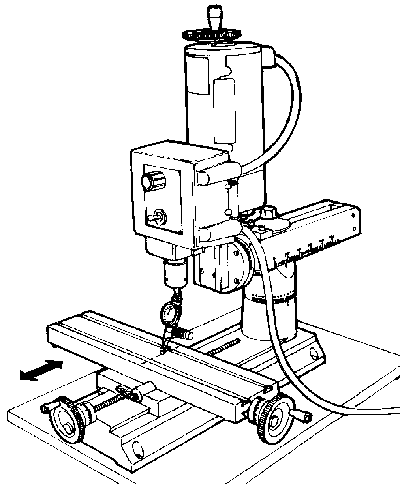
FIGURE 2-Checking for built in error in the table travel along the Y-axis
(See Figure 3.) The next decision to make is where the spindle is to be located. With all the adjustments that can be made with the 8-direction mill you'll probably start with the spindle located near the middle of the X/Y table movements. Something that isn't too obvious should be considered now. If the ram (the two-bar slide that allows you to move the head in or out and left or right) isn't square with the X-axis, the rotating column calibrations will have an error. To square up the ram, mount a dial indicator to the worktable and move the X-axis back and forth while reading the left and right surfaces of the column bed near the bottom. This only has to be done if you will be rotating the column and want to be able to rely on the angle graduation readings. Once set, lock the ram in place with the flange nut.
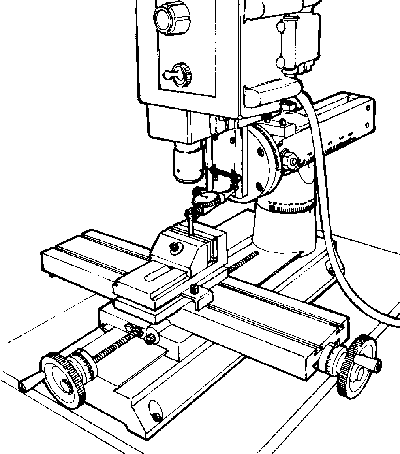
FIGURE 3-Squaring up the ram parallel to the Y-axis. The indicator can be held with a chuck on the table or a mill vise as shown here.
(See Figure 4.) The column should next be squared with the X-axis. This is accomplished with an indicator mounted in the spindle. Have the four socket head cap screws used to clamp the column rotation tight enough to keep the column from rotating, but not so tight that you can't move it with a light tap from a plastic mallet to the column bed. Because the axis that allows you to tilt the column in and out hasn't been squared yet you should only read the indicator at the same Y-axis location on the worktable that you used before. Offset the indicator at an angle in the spindle so that when the spindle is rotated it describes about a 2" to 3" circle on the table. Take readings at the extreme left and right positions. Adjust the column with light taps until there is little difference in the readings at either extreme. I wouldn't try to get it perfect yet, just close enough so there isn't a gross error.
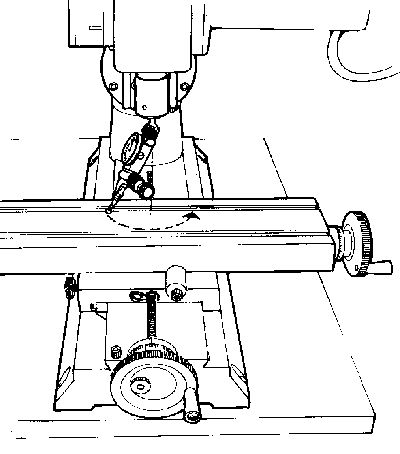
FIGURE 4-Squaring the left to right rotation of the column with the X-axis
(See Figure 5.) Loosen the flange nut on the horizontal pivot pin so that the column can be moved using the adjustment screw in the alignment block but there is no slop in the assembly. The tilt is harder to set because the spindle doesn't rotate at the pivot point, but once you understand this, the task becomes simpler. The alignment block adjustment screw helps make fine adjustments in this direction easy. With the block in place and the flange nut loose the entire assembly is kept from falling forward by the adjusting screw. This block can be left in place unless the ram is completely retracted or the column is tilted back at an angle that interferes with the block. With the indicator still held in the spindle, take readings parallel with the Y-axis near the front and rear edges of the table. Raise or lower the column with the alignment block adjusting screw until the readings are the same front and rear. Remember the location of the pivot point and allow for it.
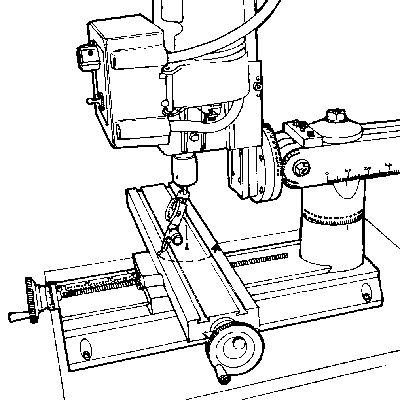
FIGURE 5-Squaring the fore and aft pivot movement of the column with the Y-axis
If the indicator reading is larger at the front of the table than the back, then that means the column must be tilted back. Say your reading is "0" at the back and .010" (.25mm) at the front. If you tipped the column back until the indicator read zero at the front, the reading at the back would not remain at "0" but would now be a negative reading. This is caused because the pivot point is located far enough behind the spindle so that both front and rear measuring points are still in front of it. Swinging the column back actually raises both points. The front point raises more than the back point, but both do go up. You will have to keep tilting the column back and measuring until you get the same reading front and back. This may require more movement that you first thought based on the difference between the initial measurements.
(See Figure 6.) It is time to make the final adjustments to the rotating column, but first I'll add a little more confusion to your life. Remember when I said that alignment pins are somewhat useless to line up a machine? Well, as much as I hate to admit it, in a sense we already have one. It is the alignment key that holds the headstock assembly square to the column saddle, which is mounted on the column bed. Removal of this key is what allows you to pivot the headstock on the Sherline lathes and mills. It is one of the features that make our machines easy to use, versatile and very adaptable. It is also another thing you have to consider when searching for "perfect" alignment. If you have more than one key, don't mix them up because they are matched during assembly to fit as closely as possible. I have found the best way to deal with this potential problem is to push the head square against the key before tightening the cone point screw that locks the headstock in place. If you ever want to check alignment of the key to the column bed, mount a dial indicator in the spindle. Raise and lower the head while reading the vertical edge of a precision square. Adjust the rotating column until there is no error as the indicator moves up and down the square. Now read the table with the indicator. If the slot and key are perfect there shouldn't be any error, but in most cases there will be a small amount. This can usually be eliminated by taking advantage of what play does exist in the alignment key and slot. With the cone point set screw loosened slightly, tap the headstock with a plastic mallet to take out play in the direction you want to go. Then retighten the set screw.
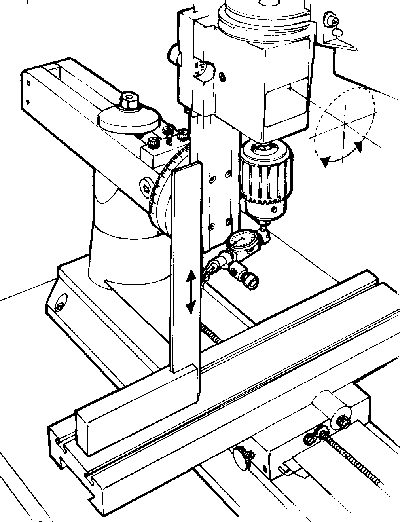
FIGURE 6-Fine tuning the headstock rotation alignment with a machinist's square and dial indicator. The headstock pivots on the saddle pin. Even with the alignment key in place, slight adjustment can be made to get the headstock perfectly square.
The rotating column and tilting adjustments can be finalized so the indicator reads "0" as the spindle is rotated, however the error we measured when checking the table flatness could be accounted for now if need be. If the pointer on the back of the rotary column disk doesn't line up with the zero mark, loosen the screw holding it in place and reset it to indicate zero for future reference.
Your machine is now "indicated in" and ready to use. As you get a feel for your machine and go through this adjustment procedure a few times, the time it takes to get good results will decrease. Being able to accurately indicate in a mill is one of the skills that must be developed by any machinist who plans on making accurate parts. Though the adjustments on larger machines may be made in slightly different ways, the skills and procedures you learn here can be applied to other machines as well.
In normal use the column spacer block will not be required. However, if you are working on a larger part or your setup requires more clearance under the swing arm, the spacer block can be installed to raise the column an additional two inches. (Installation will be made easier if you first remove the headstock/motor unit to reduce the weight of the column.) To install the spacer block, remove the flange nut on top of the column hold-down bolt, and lift off the hold-down washer so that the entire column top and swing arm assembly can be lifted off of the hold-down bolt. Screw the extension bolt onto the end of the column bolt and tighten with an adjustable wrench. Slide the column spacer over the bolt and reinstall the column top and swing arm assembly. Reinstall the headstock/motor unit.
NOTE: The column spacer block is included as standard with the Model 2000 mill. It is optional at extra cost on all mill column upgrades and 8-direction vertical milling columns and upgrades.
An upgrade to the Model 2000 mill was introduced in March, 1999. It adds 1.6" of travel to the lower end of the Z-axis movement so that end mills can be brought down below the surface of the table for working on the edge of parts. This travel extension is now standard on all Model 2000 mills. The headstock may be lowered even more by placing the column top (P/N 5655) above the swing arm instead of below it. Remove the flange nut, hold-down washer and swing arm. Place the swing arm over the hold-down bolt directly on top of the column base (P/N 5666). Place the column top back onto the hold-down bolt upside down and replace the hold-down washer and flange nut. (See Figure 7 below.) Although you cannot use the alignment lines to help square up the head, this makes for a very strong and stable setup. In most cases, however, the new travel extension will make this procedure unnecessary.
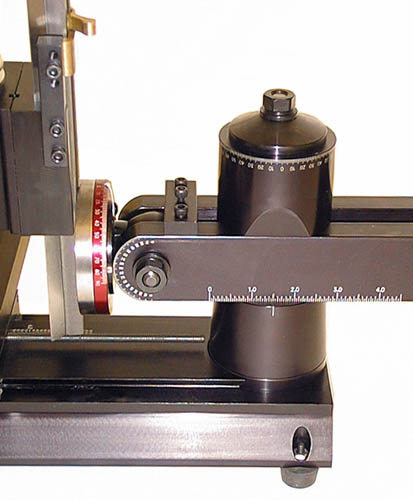
FIGURE 7—This photo above shows the column blocks repositioned to lower the ram. The column top is placed upside down above the swing arm rather than below it.
Should you wish to work on extremely tall setups that combine several holding devices (i.e., a chuck on top of a rotary table on top of a tilting angle table) you can extend Z-axis travel on the top end by either adding an additional spacer block to the column or by removing the saddle travel extension and attaching the saddle directly to the saddle nut as is done on standard Sherline mills or both.
Along with the travel extension, a new saddle locking lever was installed to replace the old saddle friction lock used prior to 2/99. This new locking lever is standard on all mills and vertical milling columns as of that date. This lever is located on the Z-axis leadscrew behind the saddle. When turned to the full clockwise position the saddle will move freely. A spring-loaded ball locates in a detent in the bottom of the lever to hold it in this position. To lock the saddle in position, move the lever to the full counterclockwise position. This locks the lever against the saddle nut which prevents the leadscrew from turning. The exploded view at the bottom of this page shows the location of the components.
I'm always at odds with myself when I write instructions on complicated procedures like describing the alignment procedure for this mill. By giving you this much information I know that I am making life easier for some customers by answering their questions. At the same time I am probably confusing another customer who would never have asked the question because of the type of work that the mill or lathe is being used for. I don't want to create a customer who spends all his time trying to achieve perfect alignment for work that doesn't require it and ends up never using the machine. Engineering is always a compromise. I deal with this fact with each new product that I design. While our machines aren't accurate enough for some customers, they are still too expensive for others. I hope you are pleased with the new capabilities this multi-direction mill can bring to your shop. I think you will find the combination of features to offer a very good machining value.
Joe Martin, President and Owner
SHERLINE Products
NOTE: These instructions are a supplement to the Sherline Assembly and Instruction Guide that comes with each new machine. For safety rules, operating instructions and information on the other components of the mill, consult that publication. It also includes basic instructions on metalworking that will be helpful for new machinists.
Any Sherline mill can be upgraded to the capabilities of a Model 2000 8-direction mill with the addition of a column upgrade kit. An 8-direction vertical milling column as well as an upgrade for existing vertical milling columns to 8-direction capabilities are also available. Except for the mounting bases, the upgrades are assembled and used in a similar manner to the Model 2000 mill. Appropriate instructions for each version are included with their purchase. The part numbers are as follows:
• Mill upgrade to 8-direction capability (fits any existing Sherline mill)-P/N 5650 (inch), 5660 (metric)
• 8-direction vertical milling column-P/N 3580 (inch), 3585 (metric)
• Upgrade for any existing vertical milling column to 8-direction capability-P/N 5680 (inch), 5685 (metric)
• 14" Model 2000 mill XY base-P/N 5600 (inch), 5610 (metric)
• 14" Model 2000 mill XYZ base-P/N 5625 (inch), 5630 (metric)
(Drawing updated 3/11/99)
|
REF. NO. |
PART NO. |
NO. REQ. |
DESCRIPTION |
|
1 |
3516 |
1 |
Graduated clamping ring |
|
2 |
3517 |
1 |
Movable clamping disk |
|
3 |
4034 |
5 |
100-32 x 1" SHCS |
|
4 |
4033 |
6 |
10-32 x 5/8" SHCS |
|
5 |
5624 |
2 |
1/4-20 x 1-1/2" SHCS |
|
6 |
5601 5602 |
1 |
#2000 mill base (inch) #2000 mill base (metric) |
|
7 |
5613 |
1 |
Arm hold-down bolt #2000 |
|
8 |
5620 |
1 |
Arm hold-down washer #2000 |
|
9 |
5621 |
1 |
3/8-16 x 2" Shouldered bolt |
|
10 |
5622 |
1 |
Swing arm side #2000 (L) |
|
11 |
5623 |
2 |
Flange nut |
|
12 |
5022 |
2 |
1/4-20 x 1-3/4" SHCS |
|
13 |
5633 |
1 |
Swing arm side #2000 (R) |
|
14 |
5635 |
1 |
Column adjustment block |
|
15 |
5640 |
1 |
Arm spacer block #2000 |
|
16 |
5644 |
1 |
Arm mount #2000 |
|
17 |
5645 |
1 |
Index tab |
|
18 |
5646 |
1 |
8-32 x 1//2" Button head screw |
|
19 |
5647 |
1 |
3/32" x 1/2" dowel pin |
|
20 |
5655 |
1 |
Model 2000 column top |
|
21 |
5666 |
1 |
Model 2000 column base |
|
22 |
5616 5615 |
1 |
Y-axis leadscrew (inch) Y-axis leadscrew (metric) |
|
23 |
5611 |
1 |
Extension bolt |
|
24 |
5677 |
1 |
Column spacer |
|
25 |
4069 |
4 |
10-32 x 3/4" SHCS |
|
26 |
4067 |
6 |
10-32 x 1/2" SHCS |
|
27 |
40177 41176 |
1 |
Saddle nut w/ spring-loaded ball (Inch Saddle nut w/ spring-loaded ball (Metric) |
|
28 |
40176 41176 |
1 |
Saddle locking lever (Inch) Saddle locking lever (Metric) |
|
29 |
40175 |
1 |
Saddle travel extension |
|
30 |
45011 45161 |
1 |
Z-axis leadscrew (Inch) Z-axis leadscrew (Metric) |
Return to Mill Instructions Section
RETURN TO ACCESSORIES MASTER LIST
Shop for Sherline LATHES
Shop for Sherline MILLING MACHINES
RETURN TO My Home Page
| Home
Page | Frequently
Asked Questions | Testimonials
| Lathes
|
| Mills
| Accessories
|
Tool
Prices | Accessory
Prices |